基于 cri-dockerd 搭建 Kubernetes 1.36 集群完整指南


本文是一份面向实践的 Kubernetes 1.36 集群搭建指南,采用 Docker + cri-dockerd 方案作为容器运行时。文章从零开始,依次涵盖 Harbor 私有镜像仓库的搭建、Rocky Linux 节点的环境准备、kubeadm 集群初始化和工作节点接入,以及 Calico 网络插件的部署。所有步骤均配有完整的命令行操作与输出日志,适合在生产或实验环境中对照执行。
Rocky虚拟机安装可以参考:https://blog.lonelybear.cn/rocky-install/
虚拟机克隆可以参考:https://blog.lonelybear.cn/cloning/
目录
环境概览
| 主机 | IP地址 | 角色 |
|---|---|---|
| Red hat 01 | 192.168.142.129 | harbor镜像仓库 |
| Rocky-master | 192.168.142.150 | Master |
| Rocky-node1 | 192.168.142.151 | Worker |
| Rocky-node2 | 192.168.142.152 | Worker |
软件版本
| 组件 | 版本 | 说明 |
|---|---|---|
| 操作系统 | Rocky Linux 10.2 | RHEL 10 兼容发行版 |
| Docker Engine | 29.7.1 | CE 版本 |
| Docker Compose | v5.3.1 | 插件内置 |
| Harbor | v2.14.2 | 离线安装包 |
| Kubernetes | v1.36.3 | 阿里云镜像源 |
| cri-dockerd | v0.3.17 | Mirantis 维护 |
| Calico | v3.32.1 | Tigera 官方 |
| CoreDNS | v1.14.2 | K8s 内置 |
| etcd | 3.6.8-0 | K8s 内置 |
| CNI 插件 | kubernetes-cni 1.9.1 | 基础网络二进制 |
网络规划
| 网络类型 | CIDR | 用途 |
|---|---|---|
| 物理网络 | 192.168.142.0/24 | 节点间通信 |
| Pod 网络 | 10.244.0.0/16 | Calico 管理 |
| Service 网络 | 10.10.0.0/12 | ClusterIP 分配 |
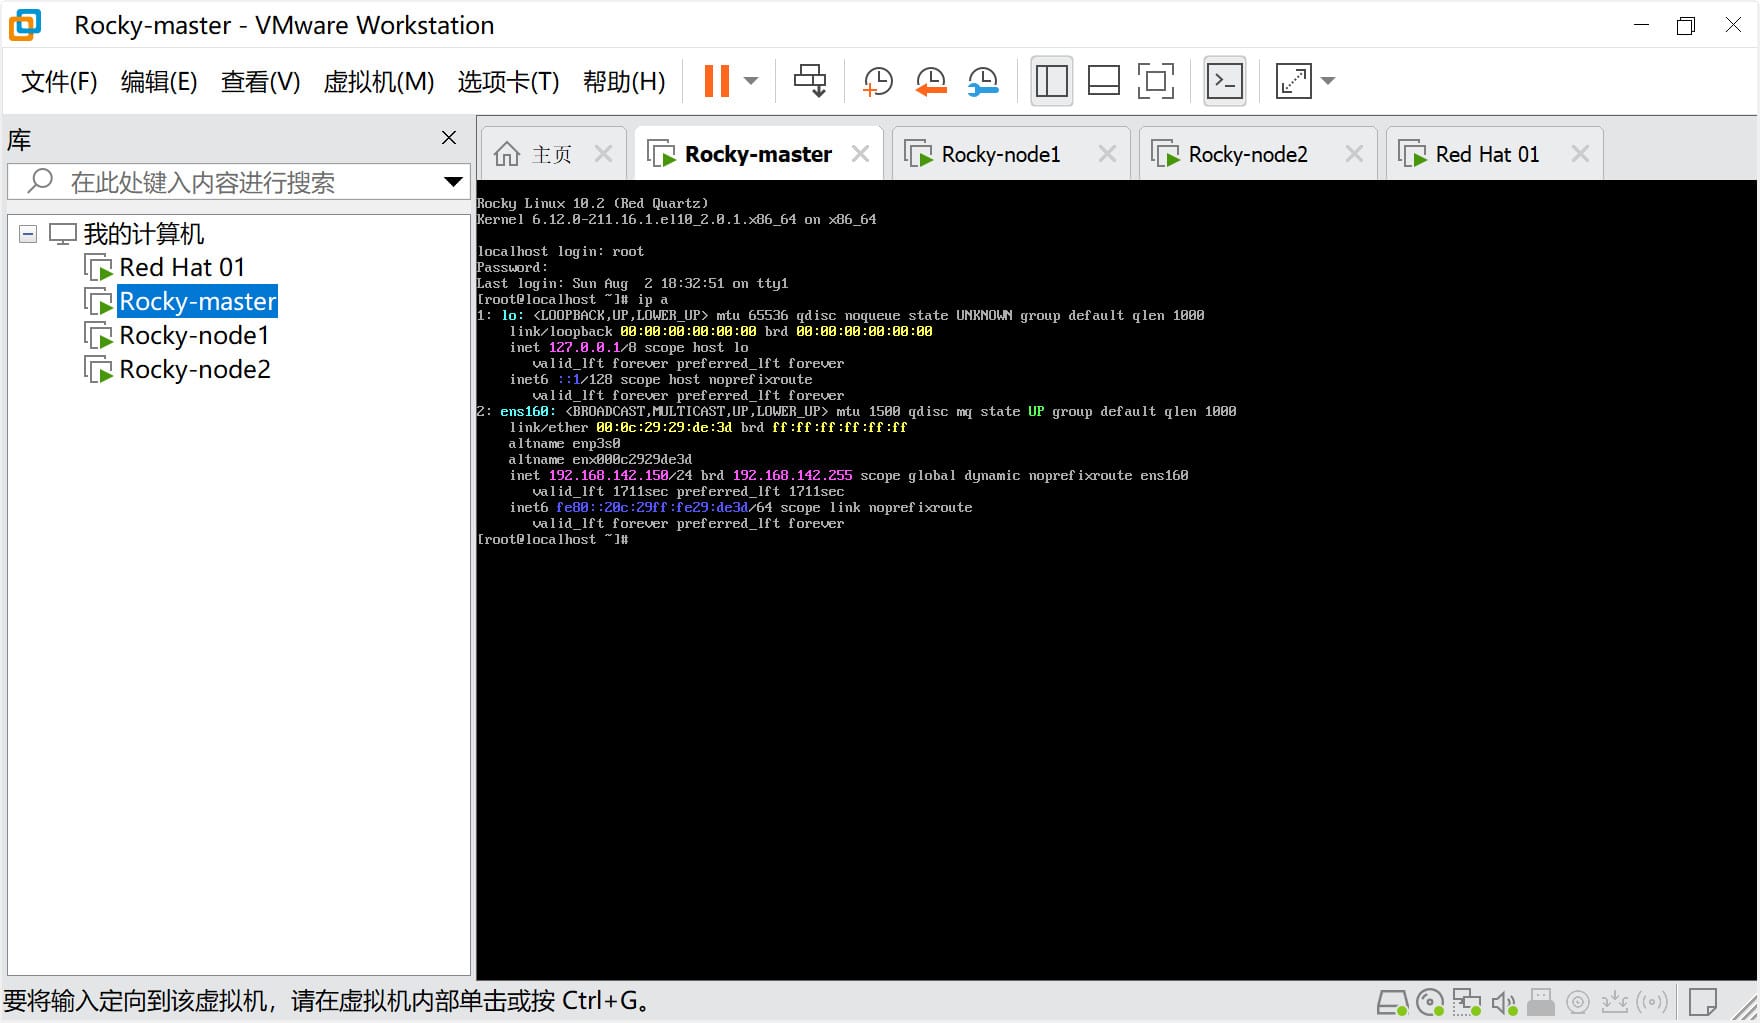
一、Harbor 镜像仓库搭建
1. 修改主机名
[root@localhost ~]# hostnamectl hostname harbor && bash
2. 配置静态IP
[root@harbor ~]# ip a
1: lo: <LOOPBACK,UP,LOWER_UP> mtu 65536 qdisc noqueue state UNKNOWN group default qlen 1000
    link/loopback 00:00:00:00:00:00 brd 00:00:00:00:00:00
    inet 127.0.0.1/8 scope host lo
       valid_lft forever preferred_lft forever
    inet6 ::1/128 scope host noprefixroute
       valid_lft forever preferred_lft forever
2: ens160: <BROADCAST,MULTICAST,UP,LOWER_UP> mtu 1500 qdisc mq state UP group default qlen 1000
    link/ether 00:0c:29:fc:a1:e3 brd ff:ff:ff:ff:ff:ff
    altname enp3s0
    altname enx000c29fca1e3
    inet 192.168.142.129/24 brd 192.168.142.255 scope global dynamic noprefixroute ens160
       valid_lft 1256sec preferred_lft 1256sec
    inet6 fe80::20c:29ff:fefc:a1e3/64 scope link noprefixroute
       valid_lft forever preferred_lft forever

#网卡要结合实际情况修改我的是ens160
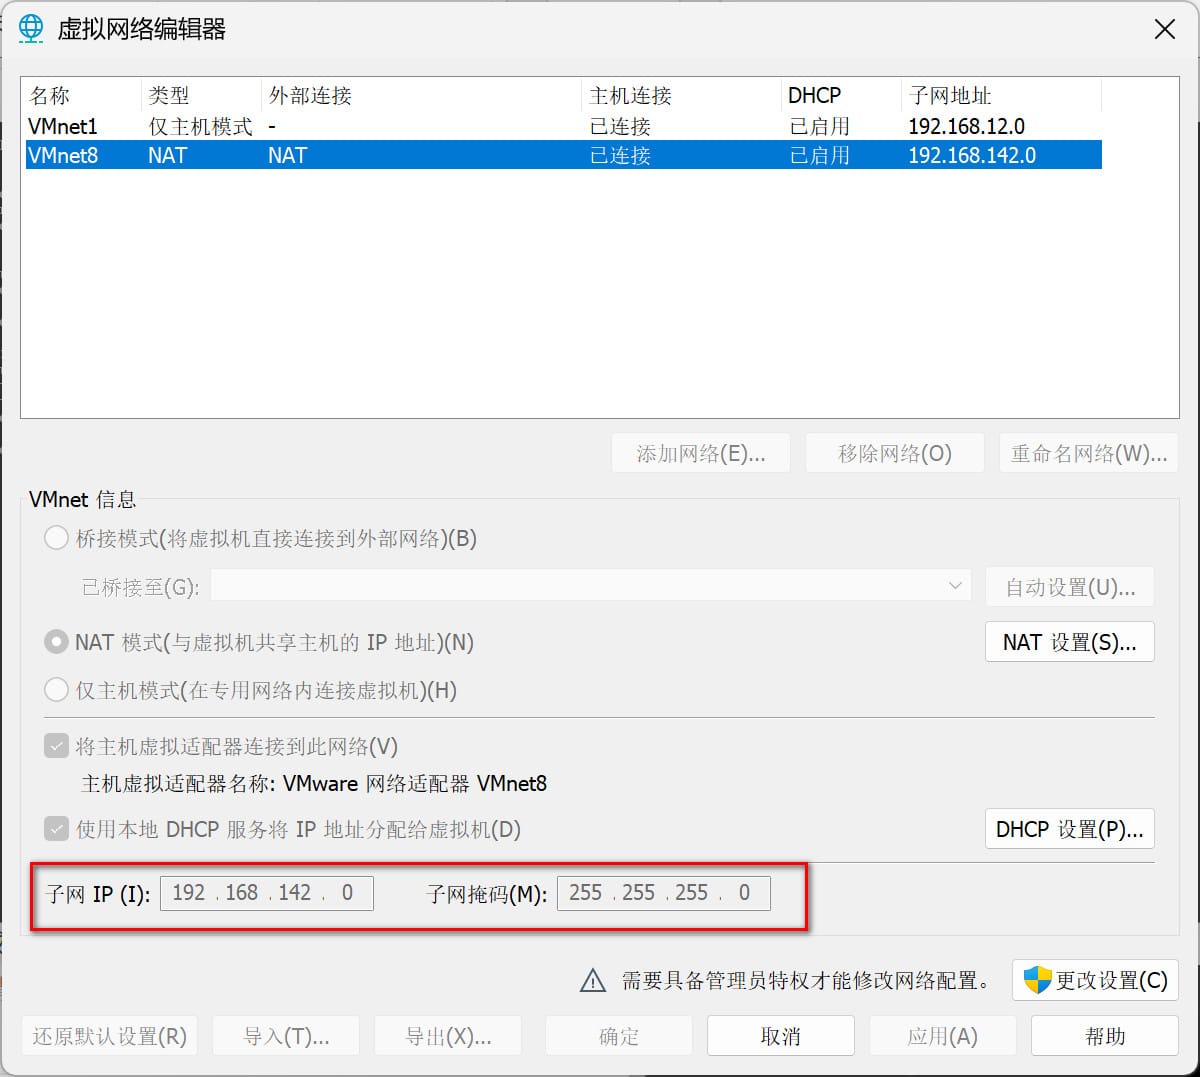
[root@harbor ~]# nmcli c m ens160 ipv4.method manual ipv4.addresses 192.168.142.129/24 ipv4.gateway 192.168.142.2 ipv4.dns "223.5.5.5 8.8.8.8" connection.autoconnect yes

[root@harbor ~]# nmcli connection up ens160
Connection successfully activated (D-Bus active path: /org/freedesktop/NetworkManager/ActiveConnection/3)
[root@harbor ~]#

#注意:网段要和子网保持一致,其次如果修改的静态IP地址和原先的不一样会导致ssh远程连接断开。
3. 开启路由转发
[root@harbor ~]# echo 'net.ipv4.ip_forward=1' >> /etc/sysctl.conf
[root@harbor ~]# sysctl -p
net.ipv4.ip_forward = 1
[root@harbor ~]#
4. 配置主机映射
cat >> /etc/hosts <<EOF
192.168.142.129 hb.reg.com harbor
192.168.142.150 k8s-master01 m1
192.168.142.151 k8s-node01 n1
192.168.142.152 k8s-node02 n2
EOF

[root@harbor ~]# tail -4 /etc/hosts
192.168.142.129 hb.reg.com harbor
192.168.142.150 k8s-master01 m1
192.168.142.151 k8s-node01 n1
192.168.142.152 k8s-node02 n2
5. 配置本地仓库
vi /etc/yum.repos.d/rpm.repo

[BaseOS]
name=BaseOS
baseurl=/mnt/BaseOS
gpgcheck=0
[AppStream]
name=AppStream
baseurl=/mnt/AppStream
gpgcheck=0
6. 挂载
#临时
mount /dev/sr0 /mnt

#自动挂载
vi /etc/fstab

/dev/sr0     /mnt      iso9660 defaults        0 0

mount -a
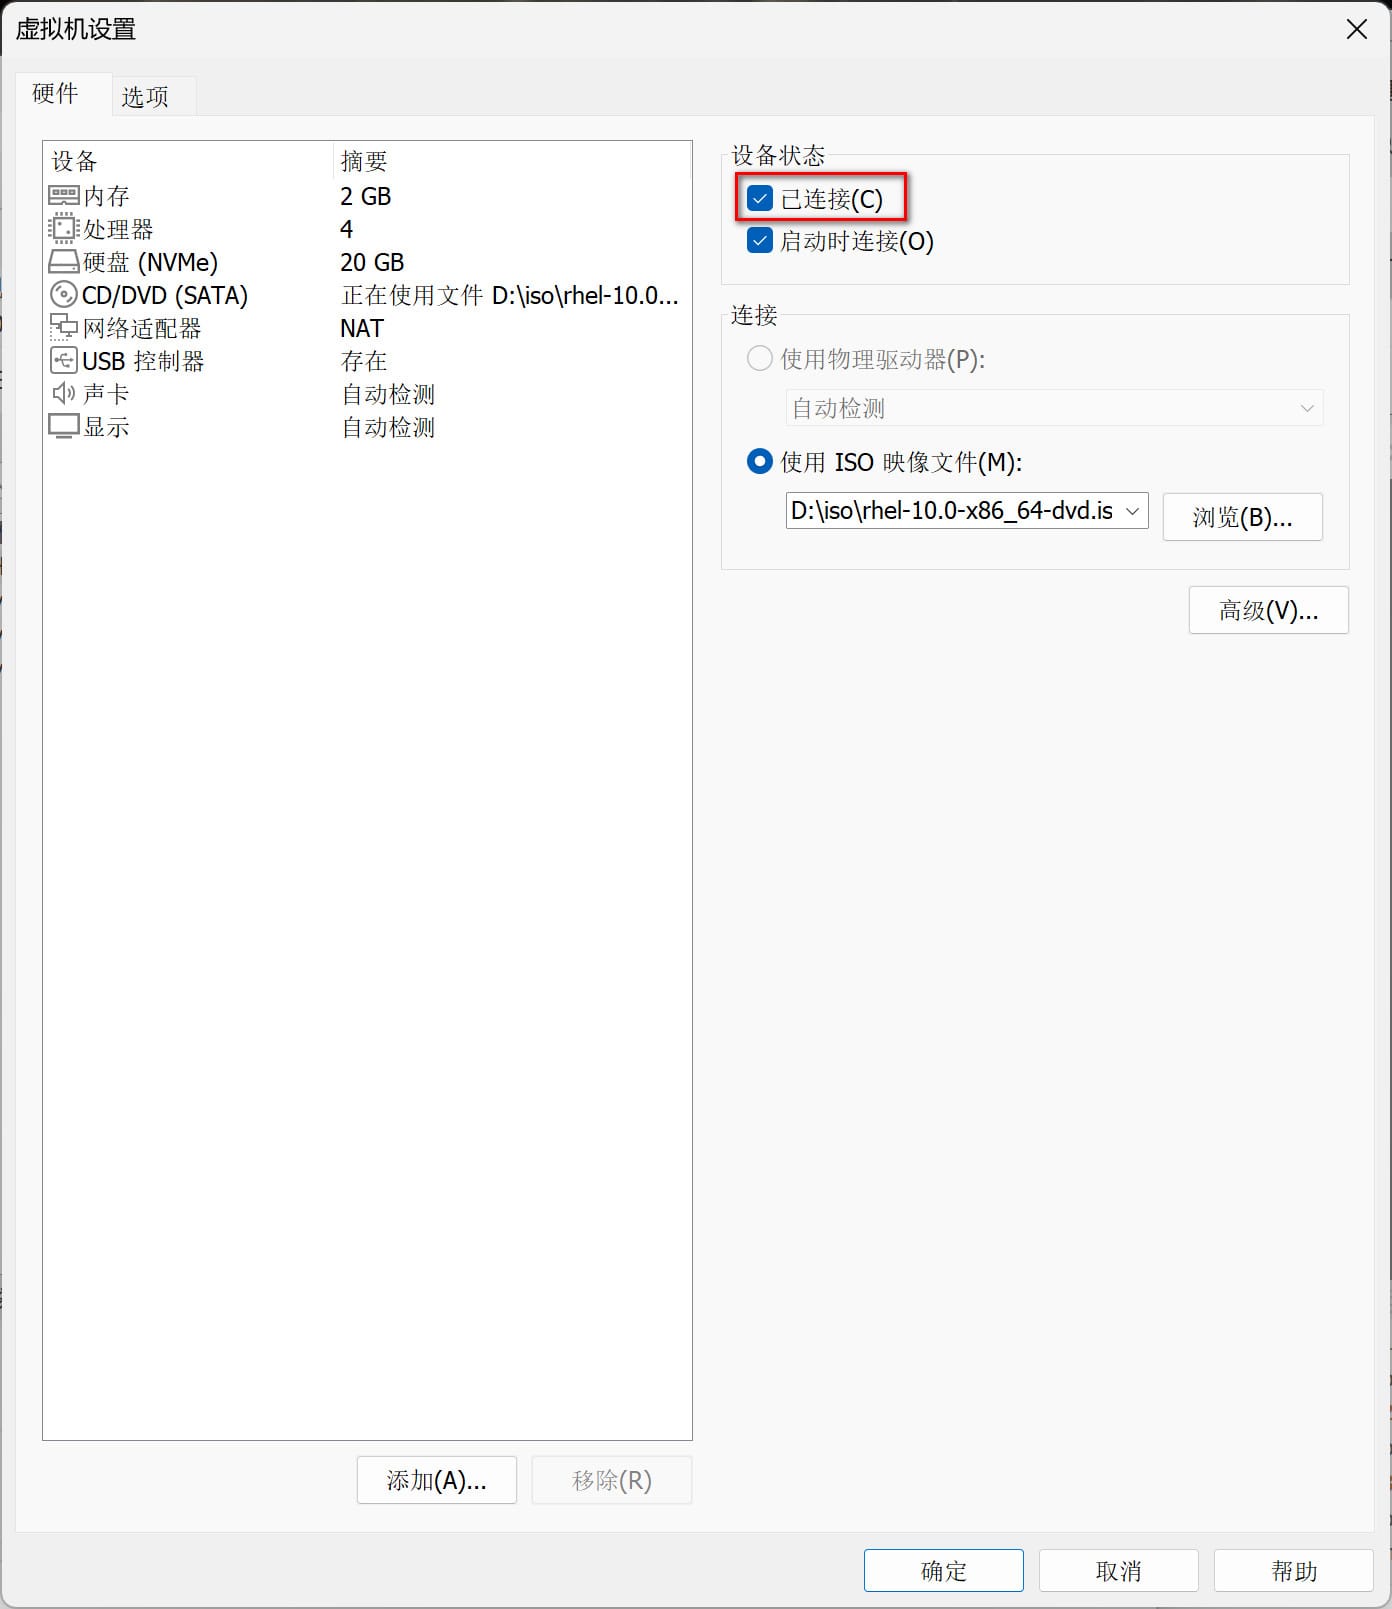
#如果遇到下面报错可以在虚拟机设置里将"已连接"勾选上
[root@harbor ~]# mount /dev/sr0 /mnt
mount: /mnt: fsconfig system call failed: /dev/sr0: Can't open blockdev.
       dmesg(1) may have more information after failed mount system call.

#再试一下应该就可以了
[root@harbor ~]# mount /dev/sr0 /mnt
mount: /mnt: WARNING: source write-protected, mounted read-only.
[root@harbor ~]# df -h
Filesystem             Size  Used Avail Use% Mounted on
……
/dev/sr0               7.9G  7.9G     0 100% /mnt
7. 常用工具安装
dnf install net-tools bash-completion wget curl vim tree -y
8. 安装 Docker
Step 1 — 安装必要的系统工具
yum install -y yum-utils
Step 2 — 添加软件源信息
yum-config-manager --add-repo https://mirrors.aliyun.com/docker-ce/linux/rhel/docker-ce.repo
Step 3 — 安装 Docker
yum install docker-ce docker-ce-cli containerd.io docker-buildx-plugin docker-compose-plugin
Step 4 — 镜像加速器
cat > /etc/docker/daemon.json <<EOF
{
  "default-ipc-mode": "shareable",
  "data-root": "/data/docker",
  "exec-opts": ["native.cgroupdriver=systemd"],
  "log-driver": "json-file",
  "log-opts": {
    "max-size": "100m",
    "max-file": "50"
  },
  "insecure-registries": ["https://hb.reg.com"],
  "registry-mirrors": [
    "https://mirror.ccs.tencentyun.com",
    "https://hub-mirror.c.163.com",
    "https://docker.xuanyuan.me",
    "https://docker.m.daocloud.io"
  ]
}
EOF
Step 5 — 开启 Docker 服务
systemctl daemon-reload
systemctl enable --now docker
systemctl status docker

docker compose version
也可以传统二进制安装 docker-compose:
mv docker-compose-linux-x86_64 docker-compose
chmod +x docker-compose
mv docker-compose /usr/bin
docker-compose -v
9. 准备 Harbor
官网地址:https://goharbor.io/docs/2.14.0/install-config
| 软件 | 版本 | 作用 |
|---|---|---|
| Docker Engine | Version > 20.10 | 用于运行Harbor环境 |
| Docker Compose | Docker compose > 2.3 | 用于管理Harbor服务 |
| OpenSSL | Latest (optional) | 用于生成Harbor访问的私钥和证书 |
[root@harbor harbor]# docker --version
Docker version 29.7.1, build e9452d6
[root@harbor harbor]# docker compose version
Docker Compose version v5.3.1
[root@harbor harbor]# openssl -v
OpenSSL 3.2.2 4 Jun 2024 (Library: OpenSSL 3.2.2 4 Jun 2024)
[root@harbor harbor]#
Step 1 — 安装 Harbor
#下载二进制包
wget https://github.com/goharbor/harbor/releases/download/v2.14.2/harbor-offline-installer-v2.14.2.tgz
[root@harbor ~]# ls
harbor-offline-installer-v2.14.2.tgz
[root@harbor ~]# tar -xzf harbor-offline-installer-v2.14.2.tgz -C /usr/local/
[root@harbor ~]# cd /usr/local/harbor/
[root@harbor harbor]# ls
common.sh  harbor.v2.14.2.tar.gz  harbor.yml.tmpl  install.sh  LICENSE  prepare
[root@harbor harbor]#
Step 2 — 关闭防火墙和 SELinux(实验环境可临时关闭)
[root@harbor harbor]# systemctl disable --now firewalld.service
Removed '/etc/systemd/system/multi-user.target.wants/firewalld.service'.
Removed '/etc/systemd/system/dbus-org.fedoraproject.FirewallD1.service'.
[root@harbor harbor]# systemctl is-active firewalld.service
inactive
[root@harbor harbor]# setenforce 0
[root@harbor harbor]# getenforce
Permissive
[root@harbor harbor]#
Step 3 — 配置证书
官方文档:https://goharbor.io/docs/2.14.0/install-config/configure-https/
#生成CA证书
[root@harbor harbor]# mkdir certs
[root@harbor harbor]# cd certs
[root@harbor certs]# openssl genrsa -out ca.key 4096
[root@harbor certs]# openssl req -x509 -new -nodes -sha512 -days 3650 \
-subj "/C=CN/ST=Chongqing/L=Chongqing/O=Banan/OU=Chengke/CN=hb.reg.com" \
-key ca.key \
-out ca.crt
[root@harbor certs]# ls
ca.crt  ca.key
[root@harbor certs]#
Step 4 — 生成服务器证书
# 生成服务私钥
[root@harbor certs]# openssl genrsa -out hb.reg.com.key 4096

#根据私钥生成服务证书请求(CSR)
[root@harbor certs]# openssl req -sha512 -new \
-subj "/C=CN/ST=Chongqing/L=Chongqing/O=Banan/OU=Chengke/CN=hb.reg.com" \
-key hb.reg.com.key \
-out hb.reg.com.csr
[root@harbor certs]# ls
ca.crt  ca.key  hb.reg.com.csr  hb.reg.com.key

#生成一个x509 v3扩展文件
[root@harbor certs]# cat > v3.ext <<-EOF
authorityKeyIdentifier=keyid,issuer
basicConstraints=CA:FALSE
keyUsage = digitalSignature, nonRepudiation, keyEncipherment, dataEncipherment
extendedKeyUsage = serverAuth
subjectAltName = @alt_names
[alt_names]
DNS.1=hb.reg.com
DNS.2=hb.reg
DNS.3=harbor
EOF
[root@harbor certs]# ls
ca.crt  ca.key  hb.reg.com.csr  hb.reg.com.key  v3.ext

#使用该v3.ext文件为Harbor主机生成证书
[root@harbor certs]# openssl x509 -req -sha512 -days 3650 \
-extfile v3.ext \
-CA ca.crt -CAkey ca.key -CAcreateserial \
-in hb.reg.com.csr \
-out hb.reg.com.crt
Certificate request self-signature ok
subject=C=CN, ST=Chongqing, L=Chongqing, O=Banan, OU=Chengke, CN=hb.reg.com
[root@harbor certs]# ls
ca.crt  ca.key  ca.srl  hb.reg.com.crt  hb.reg.com.csr  hb.reg.com.key  v3.ext
Step 5 — 向 Harbor 和 Docker 提供证书
#将服务器证书和密钥复制到 Harbor 主机上的 certificates 文件夹中
[root@harbor certs]# pwd
/usr/local/harbor/certs
[root@harbor certs]# ls
ca.crt  ca.key  ca.srl  hb.reg.com.crt  hb.reg.com.csr  hb.reg.com.key  v3.ext
[root@harbor certs]# mkdir -p /data/certs
[root@harbor certs]# cp hb.reg.com.crt /data/certs/
[root@harbor certs]# cp hb.reg.com.key /data/certs/
[root@harbor certs]# ls /data/certs/
hb.reg.com.crt  hb.reg.com.key

#转换 hb.reg.com.crt 为 hb.reg.com.cert,供 Docker 使用
[root@harbor certs]# openssl x509 -inform PEM -in hb.reg.com.crt -out hb.reg.com.cert
[root@harbor certs]# ls
ca.crt  ca.key  ca.srl  hb.reg.com.cert  hb.reg.com.crt  hb.reg.com.csr  hb.reg.com.key  v3.ext


#将服务器证书,私钥文件和 CA 文件复制到 Harbor 主机上的 Docker 证书文件夹中
[root@harbor certs]# cp hb.reg.com.cert hb.reg.com.key ca.crt /etc/docker/certs.d/hb.reg.com/

[root@harbor certs]# tree /etc/docker/certs.d/
/etc/docker/certs.d/
└── hb.reg.com
    ├── ca.crt
    ├── hb.reg.com.cert
    └── hb.reg.com.key

2 directories, 3 files
Step 6 — 重新启动 Docker Engine
[root@harbor certs]# systemctl restart docker
10. 配置 Harbor
#step1:修改配置文件
[root@harbor ~]# cd /usr/local/harbor
[root@harbor harbor]# ls
certs  common.sh  harbor.v2.14.2.tar.gz  harbor.yml.tmpl  install.sh  LICENSE  prepare
[root@harbor harbor]# cp harbor.yml.tmpl harbor.yml
[root@harbor harbor]# ls
certs  common.sh  harbor.v2.14.2.tar.gz  harbor.yml  harbor.yml.tmpl  install.sh  LICENSE  prepare
[root@harbor harbor]# vim harbor.yml
#修改项如下:
# DO NOT use localhost or 127.0.0.1, because Harbor needs to be accessed by
external clients.
hostname: hb.reg.com
# http related config
http:
# port for http, default is 80. If https enabled, this port will redirect to
https port
port: 80
# https related config
https:
# https port for harbor, default is 443
port: 443
# The path of cert and key files for nginx
certificate: /data/certs/hb.reg.com.crt
private_key: /data/certs/hb.reg.com.key
.....
# Remember Change the admin password from UI after launching Harbor.
harbor_admin_password: hb123
......
# The default data volume
data_volume: /data/harbor
.......


#step2:创建数据卷目录
[root@harbor harbor]# mkdir -p /data/harbor
[root@harbor harbor]# mkdir -p /data/docker
[root@harbor harbor]# ls /data/
certs  docker  harbor
11. 加载 Harbor 镜像
[root@harbor harbor]# ls
certs  common.sh  harbor.v2.14.2.tar.gz  harbor.yml  harbor.yml.tmpl  install.sh  LICENSE  prepare
[root@harbor harbor]# docker load -i harbor.v2.14.2.tar.gz
Loaded image: goharbor/prepare:v2.14.2
Loaded image: goharbor/trivy-adapter-photon:v2.14.2
Loaded image: goharbor/harbor-core:v2.14.2
Loaded image: goharbor/harbor-db:v2.14.2
Loaded image: goharbor/harbor-jobservice:v2.14.2
Loaded image: goharbor/harbor-registryctl:v2.14.2
Loaded image: goharbor/nginx-photon:v2.14.2
Loaded image: goharbor/harbor-portal:v2.14.2
Loaded image: goharbor/redis-photon:v2.14.2
Loaded image: goharbor/registry-photon:v2.14.2
Loaded image: goharbor/harbor-log:v2.14.2
Loaded image: goharbor/harbor-exporter:v2.14.2


[root@harbor harbor]# docker images

IMAGE                                   ID             DISK USAGE   CONTENT SIZE   EXTRA
goharbor/harbor-core:v2.14.2            def2f48ebb3a        413MB          205MB
goharbor/harbor-db:v2.14.2              3417b2d261fe        593MB          293MB
goharbor/harbor-exporter:v2.14.2        ae87109e4c79        269MB          133MB
goharbor/harbor-jobservice:v2.14.2      2ad0c5a5810c        362MB          180MB
goharbor/harbor-log:v2.14.2             32448bb26446        379MB          188MB
goharbor/harbor-portal:v2.14.2          32fb3a3f57cd        370MB          183MB
goharbor/harbor-registryctl:v2.14.2     cfa0b205c9fd        334MB          167MB
goharbor/nginx-photon:v2.14.2           09aadc2e99b0        353MB          175MB
goharbor/prepare:v2.14.2                a4380f5d2bab        413MB          203MB
goharbor/redis-photon:v2.14.2           ac49d496e188        383MB          190MB
goharbor/registry-photon:v2.14.2        a4cf93bc522b        177MB         88.4MB
goharbor/trivy-adapter-photon:v2.14.2   4201757303dd        807MB          403MB
12. 启动 Harbor
踩坑提示:必须先运行
./prepare --with-trivy生成配置文件,跳过这一步容易出问题。
cd /usr/local/harbor

# 先跑 prepare 生成配置文件(跳过这步,容易踩坑)
./prepare --with-trivy

# 正式安装启动
./install.sh --with-trivy
展开查看完整输出
[root@harbor harbor]# cd /usr/local/harbor
[root@harbor harbor]# ./prepare --with-trivy
prepare base dir is set to /usr/local/harbor
Generated configuration file: /config/portal/nginx.conf
Generated configuration file: /config/log/logrotate.conf
Generated configuration file: /config/log/rsyslog_docker.conf
Generated configuration file: /config/nginx/nginx.conf
Generated configuration file: /config/core/env
Generated configuration file: /config/core/app.conf
Generated configuration file: /config/registry/config.yml
Generated configuration file: /config/registryctl/env
Generated configuration file: /config/registryctl/config.yml
Generated configuration file: /config/db/env
Generated configuration file: /config/jobservice/env
Generated configuration file: /config/jobservice/config.yml
……
Generated and saved secret to file: /data/secret/keys/secretkey
Successfully called func: create_root_cert
Generated configuration file: /config/trivy-adapter/env
Generated configuration file: /compose_location/docker-compose.yml
Clean up the input dir

[root@harbor harbor]# ./install.sh --with-trivy

[Step 0]: checking if docker is installed ...

Note: docker version: 29.7.1

[Step 1]: checking docker-compose is installed ...

Note: Docker Compose version v5.3.1

[Step 2]: loading Harbor images ...
Loaded image: goharbor/prepare:v2.14.2
Loaded image: goharbor/trivy-adapter-photon:v2.14.2
Loaded image: goharbor/harbor-core:v2.14.2
Loaded image: goharbor/harbor-db:v2.14.2
Loaded image: goharbor/harbor-jobservice:v2.14.2
Loaded image: goharbor/harbor-registryctl:v2.14.2
Loaded image: goharbor/nginx-photon:v2.14.2
Loaded image: goharbor/harbor-portal:v2.14.2
Loaded image: goharbor/redis-photon:v2.14.2
Loaded image: goharbor/registry-photon:v2.14.2
Loaded image: goharbor/harbor-log:v2.14.2
Loaded image: goharbor/harbor-exporter:v2.14.2


[Step 3]: preparing environment ...

[Step 4]: preparing harbor configs ...
prepare base dir is set to /usr/local/harbor
Clearing the configuration file: /config/portal/nginx.conf
Clearing the configuration file: /config/log/logrotate.conf
Clearing the configuration file: /config/log/rsyslog_docker.conf
Clearing the configuration file: /config/nginx/nginx.conf
Clearing the configuration file: /config/core/env
Clearing the configuration file: /config/core/app.conf
Clearing the configuration file: /config/registry/passwd
Clearing the configuration file: /config/registry/config.yml
Clearing the configuration file: /config/registryctl/env
Clearing the configuration file: /config/registryctl/config.yml
Clearing the configuration file: /config/db/env
Clearing the configuration file: /config/jobservice/env
Clearing the configuration file: /config/jobservice/config.yml
Clearing the configuration file: /config/trivy-adapter/env
Generated configuration file: /config/portal/nginx.conf
Generated configuration file: /config/log/logrotate.conf
Generated configuration file: /config/log/rsyslog_docker.conf
Generated configuration file: /config/nginx/nginx.conf
Generated configuration file: /config/core/env
Generated configuration file: /config/core/app.conf
Generated configuration file: /config/registry/config.yml
Generated configuration file: /config/registryctl/env
Generated configuration file: /config/registryctl/config.yml
Generated configuration file: /config/db/env
Generated configuration file: /config/jobservice/env
Generated configuration file: /config/jobservice/config.yml
……
loaded secret from file: /data/secret/keys/secretkey
Generated configuration file: /config/trivy-adapter/env
Generated configuration file: /compose_location/docker-compose.yml
Clean up the input dir


Note: stopping existing Harbor instance ...


[Step 5]: starting Harbor ...
[+] up 11/11
 ✔ Network harbor_harbor       Created                                                                     0.0s
 ✔ Container harbor-log        Started                                                                     0.3s
 ✔ Container registry          Started                                                                     0.6s
 ✔ Container harbor-db         Started                                                                     0.6s
 ✔ Container registryctl       Started                                                                     0.6s
 ✔ Container redis             Started                                                                     0.5s
 ✔ Container harbor-portal     Started                                                                     0.6s
 ✔ Container trivy-adapter     Started                                                                     0.7s
 ✔ Container harbor-core       Started                                                                     0.8s
 ✔ Container harbor-jobservice Started                                                                     0.9s
 ✔ Container nginx             Started                                                                     1.0s
✔ ----Harbor has been installed and started successfully.----

#目录中会生成 docker-compose.yml 文件和 common 目录
[root@harbor harbor]# ls
certs   common.sh           harbor.v2.14.2.tar.gz  harbor.yml.tmpl  LICENSE
common  docker-compose.yml  harbor.yml             install.sh       prepare
[root@harbor harbor]#

[root@harbor harbor]# docker compose ps
NAME                IMAGE                                   COMMAND                  SERVICE         CREATED              STATUS                        PORTS
harbor-core         goharbor/harbor-core:v2.14.2            "/harbor/entrypoint.…"   core            About a minute ago   Up About a minute (healthy)
harbor-db           goharbor/harbor-db:v2.14.2              "/docker-entrypoint.…"   postgresql      About a minute ago   Up About a minute (healthy)
harbor-jobservice   goharbor/harbor-jobservice:v2.14.2      "/harbor/entrypoint.…"   jobservice      About a minute ago   Up About a minute (healthy)
harbor-log          goharbor/harbor-log:v2.14.2             "/bin/sh -c /usr/loc…"   log             About a minute ago   Up About a minute (healthy)   127.0.0.1:1514->10514/tcp
harbor-portal       goharbor/harbor-portal:v2.14.2          "nginx -g 'daemon of…"   portal          About a minute ago   Up About a minute (healthy)
nginx               goharbor/nginx-photon:v2.14.2           "nginx -g 'daemon of…"   proxy           About a minute ago   Up About a minute (healthy)   0.0.0.0:80->8080/tcp, [::]:80->8080/tcp, 0.0.0.0:443->8443/tcp, [::]:443->8443/tcp
redis               goharbor/redis-photon:v2.14.2           "redis-server /etc/r…"   redis           About a minute ago   Up About a minute (healthy)
registry            goharbor/registry-photon:v2.14.2        "/home/harbor/entryp…"   registry        About a minute ago   Up About a minute (healthy)
registryctl         goharbor/harbor-registryctl:v2.14.2     "/home/harbor/start.…"   registryctl     About a minute ago   Up About a minute (healthy)
trivy-adapter       goharbor/trivy-adapter-photon:v2.14.2   "/home/scanner/entry…"   trivy-adapter   About a minute ago   Up About a minute (healthy)
[root@harbor harbor]#
13. 配置启动服务
[root@harbor harbor]# docker compose down
[+] down 11/11
 ✔ Container nginx             Removed                                                                     0.2s
 ✔ Container registryctl       Removed                                                                     0.1s
 ✔ Container harbor-jobservice Removed                                                                     0.2s
 ✔ Container trivy-adapter     Removed                                                                     0.2s
 ✔ Container harbor-portal     Removed                                                                     0.1s
 ✔ Container harbor-core       Removed                                                                     3.1s
 ✔ Container registry          Removed                                                                     0.1s
 ✔ Container redis             Removed                                                                     0.1s
 ✔ Container harbor-db         Removed                                                                     0.1s
 ✔ Container harbor-log        Removed                                                                    10.1s
 ✔ Network harbor_harbor       Removed                                                                     0.1s
[root@harbor harbor]# vim /usr/lib/systemd/system/harbor.service
[root@harbor harbor]# cat /usr/lib/systemd/system/harbor.service
[Unit]
Documentation=https://goharbor.io/docs/
Description=Harbor
After=docker.service systemd-networkd.service systemd-resolved.service
Requires=docker.service

#如果是二进制安装docker-compose则需要改为
#ExecStart=/usr/bin/docker-compose -f /usr/local/harbor/docker-compose.yml up
#ExecStop=/usr/bin/docker-compose -f /usr/local/harbor/docker-compose.yml down
[Service]
Type=simple
ExecStart=/usr/bin/docker compose -f /usr/local/harbor/docker-compose.yml up
ExecStop=/usr/bin/docker compose -f /usr/local/harbor/docker-compose.yml down
Restart=on-failure
RestartSec=5

[Install]
WantedBy=multi-user.target
[root@harbor harbor]# systemctl daemon-reload
[root@harbor harbor]# systemctl stop harbor.service
[root@harbor harbor]# systemctl start harbor
[root@harbor harbor]# systemctl status harbor
Harbor 客户端配置
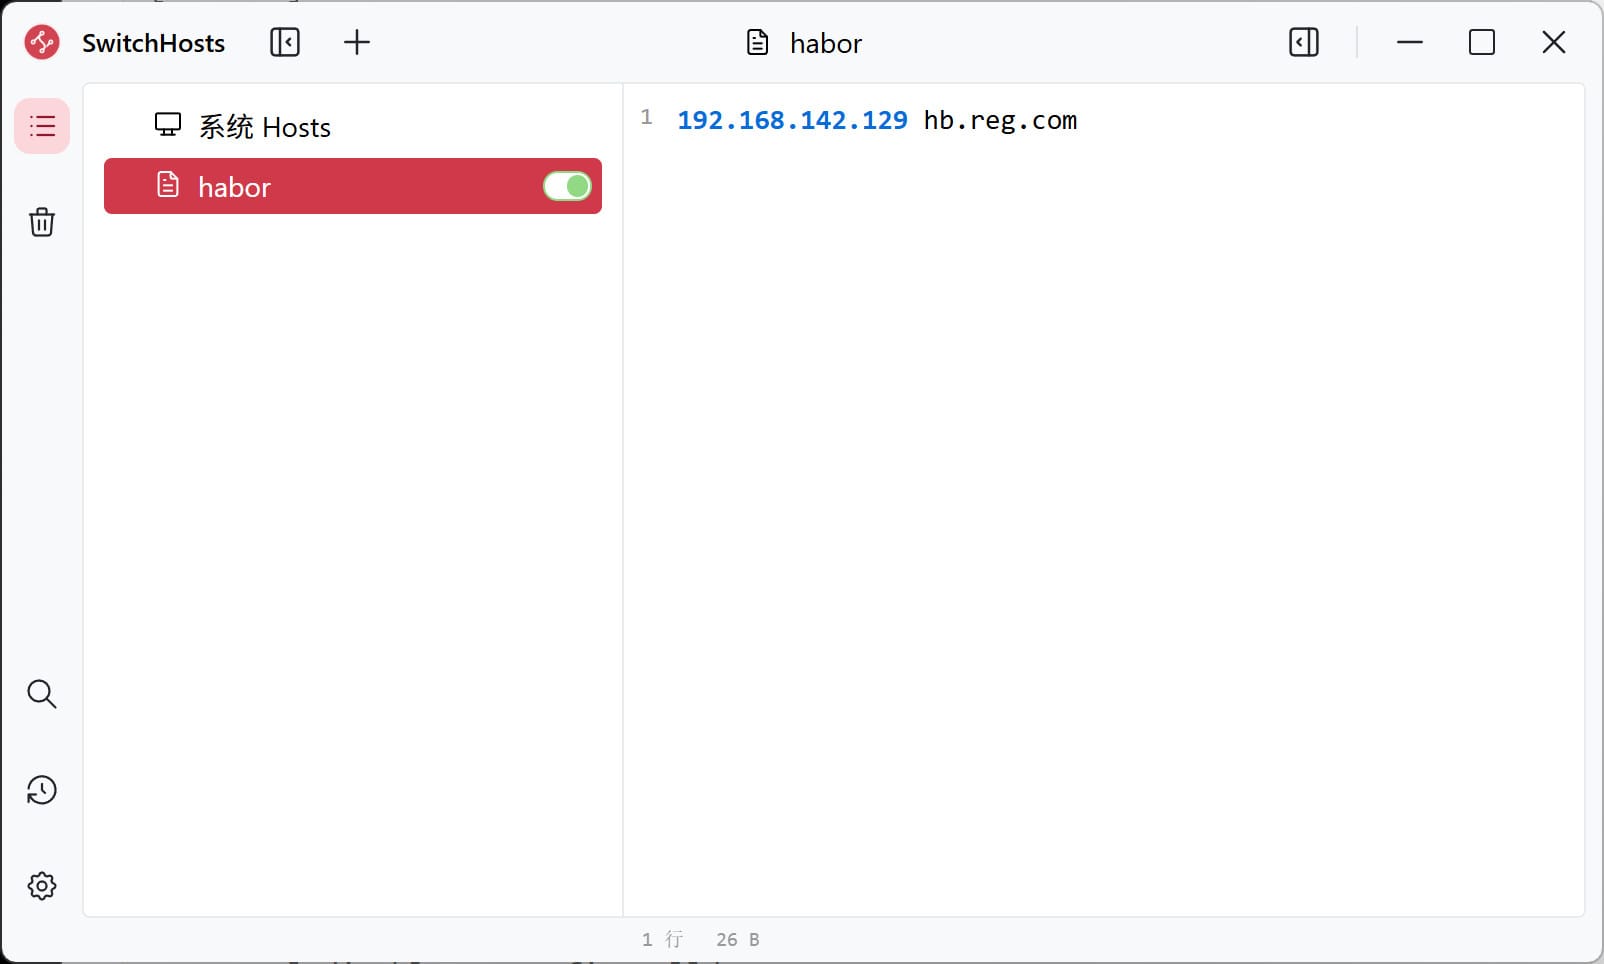
在 Windows 的 hosts 文件中配置 IP 和主机映射。推荐使用软件 SwitchHosts。
"C:\Windows\System32\drivers\etc\hosts"
#文件末尾加上
192.168.142.129 hb.reg.com
注意:默认 HTTP 私有仓库不能访问,需要设置以下参数才可以。前面已经配置过了。
vim /etc/docker/daemon.json

{
"insecure-registries" : ["https://hb.reg.com"]
}
测试(可选)
#.拉取基础镜像
[root@harbor harbor]# docker pull busybox:1.37
1.37: Pulling from library/busybox
436a1b1fd078: Pull complete
a4d00a06cf87: Download complete
Digest: sha256:9db7b59979c38555a39def84a31fb98b5296952f9e3afd4f6f11f05b07adfab0
Status: Downloaded newer image for busybox:1.37
docker.io/library/busybox:1.37
#重新打标签
[root@harbor harbor]# docker tag busybox:1.37 hb.reg.com/library/busybox:1.37
# 登录 Harbor
[root@harbor harbor]# docker login hb.reg.com
Username: admin
Password: # 此处输入hb123
WARNING! Your credentials are stored unencrypted in '/root/.docker/config.json'.
Configure a credential helper to remove this warning. See
https://docs.docker.com/go/credential-store/

#推送到自己搭建的镜像仓库
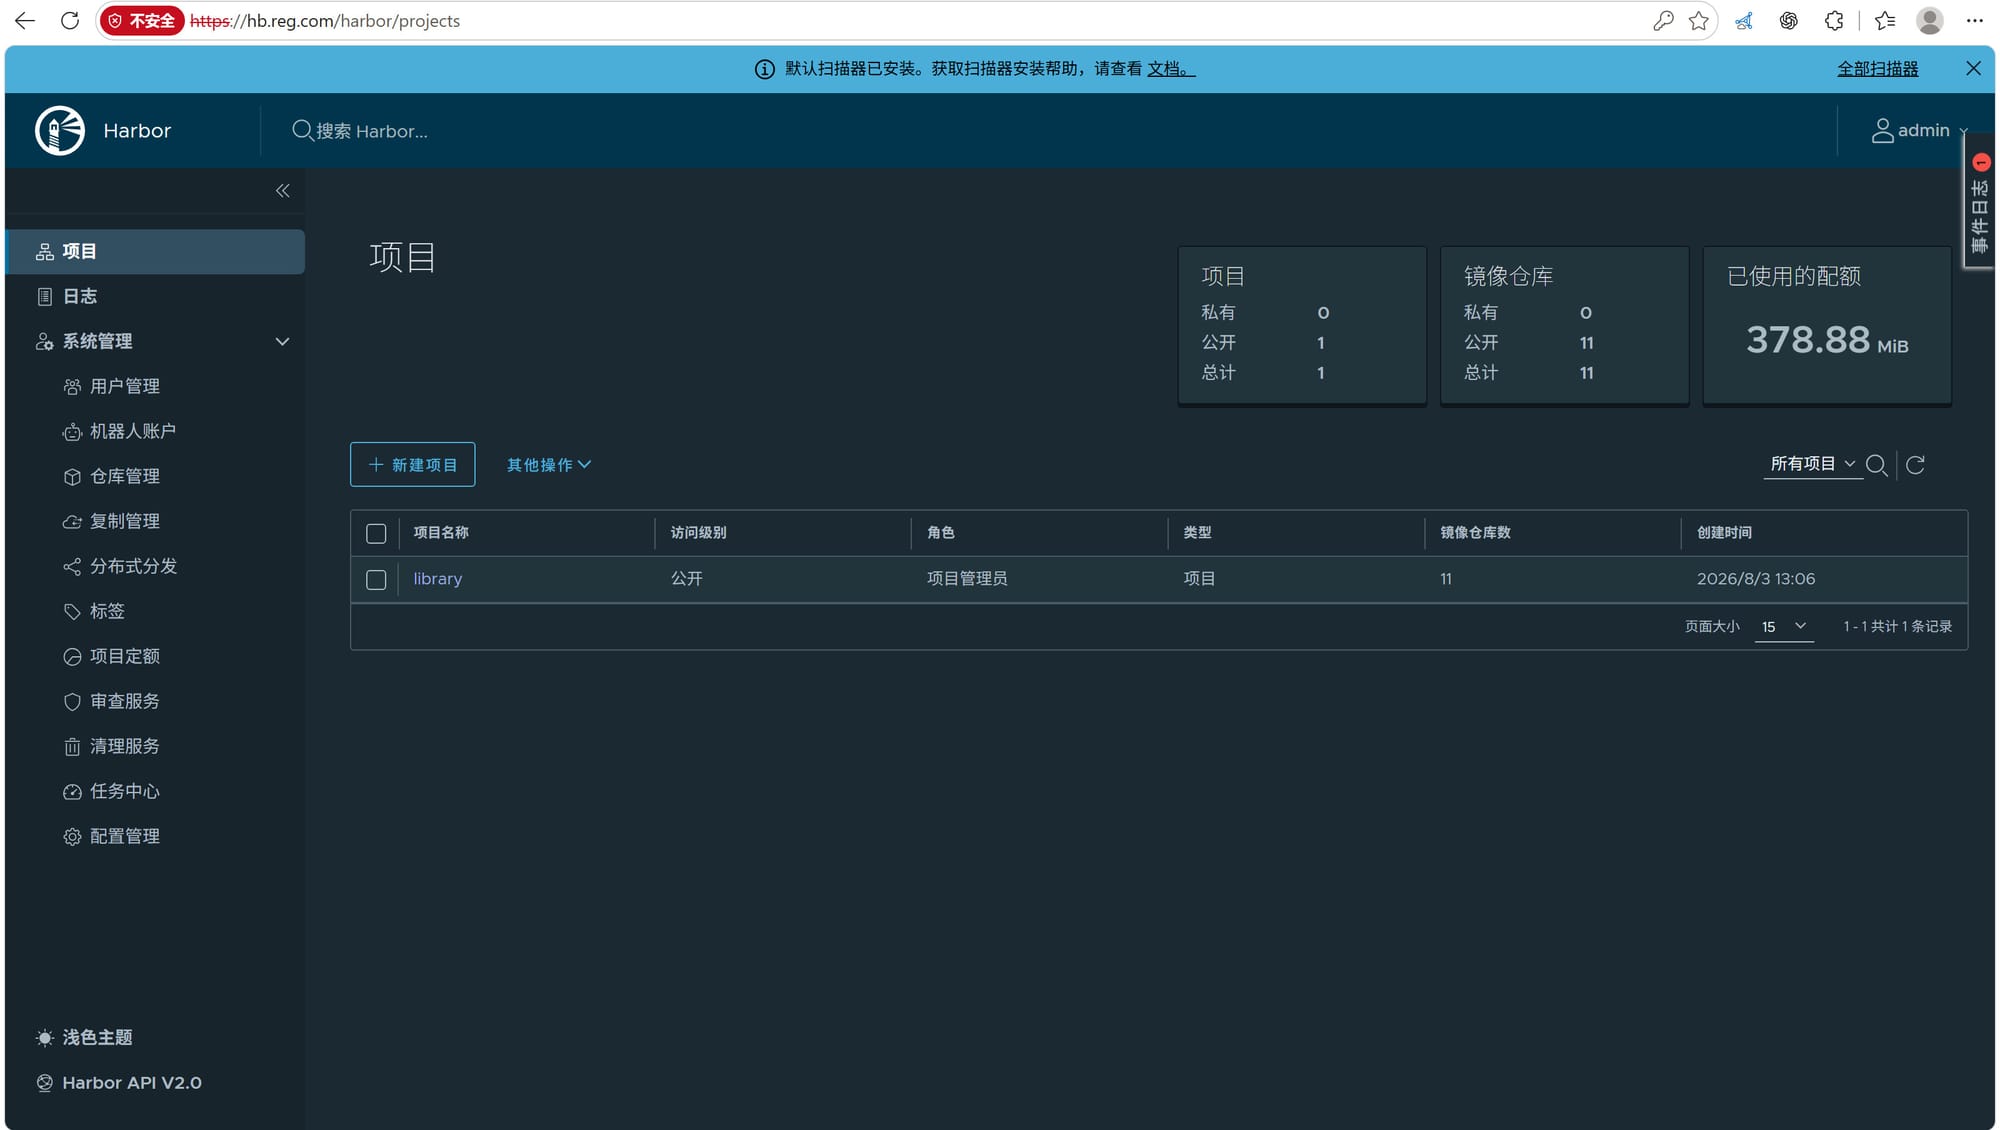
[root@harbor harbor]# docker push hb.reg.com/library/busybox:1.37
The push refers to repository [hb.reg.com/library/busybox]
436a1b1fd078: Pushed
1.37: digest: sha256:7a3ebe5bfd1a4a19797d20b0c0bb39d44393e9a03fd852c0865b0f540d868df0 size: 610

i Info → Not all multiplatform-content is present and only the available single-platform image was pushed
         sha256:9db7b59979c38555a39def84a31fb98b5296952f9e3afd4f6f11f05b07adfab0 -> sha256:7a3ebe5bfd1a4a19720b0c0bb39d44393e9a03fd852c0865b0f540d868df0

#清理本地镜像
[root@harbor harbor]# docker images | grep busybox
busybox:1.37                            9db7b59979c3        6.7MB         2.22MB
hb.reg.com/library/busybox:1.37         9db7b59979c3        6.7MB         2.22MB
[root@harbor harbor]# docker rmi busybox:1.37 hb.reg.com/library/busybox:1.37
Untagged: busybox:1.37
Untagged: hb.reg.com/library/busybox:1.37
Deleted: sha256:9db7b59979c38555a39def84a31fb98b5296952f9e3afd4f6f11f05b07adfab0

#从私有仓库拉回验证
[root@harbor harbor]# docker pull hb.reg.com/library/busybox:1.37
1.37: Pulling from library/busybox
436a1b1fd078: Pull complete
Digest: sha256:7a3ebe5bfd1a4a19797d20b0c0bb39d44393e9a03fd852c0865b0f540d868df0
Status: Downloaded newer image for hb.reg.com/library/busybox:1.37
hb.reg.com/library/busybox:1.37
[root@harbor harbor]# docker images | grep busybox
hb.reg.com/library/busybox:1.37         7a3ebe5bfd1a        6.7MB         2.21MB
二、集群准备
在 Rocky-master、Rocky-node1、Rocky-node2 三台主机上操作。
Rocky Linux 是基于 RHEL 源码重建的发行版,安装完成后
/etc/yum.repos.d/里会自动包含官方的软件仓库配置。常见的就是这几个:
rocky.repo— 包含 BaseOS、AppStream、Extras 等核心仓库Rocky-AppStream.repo、Rocky-BaseOS.repo、Rocky-Extras.repo等- 关键系统组件仓库:
Rocky-PowerTools.repo(8 系列)、Rocky-CR.repo、Rocky-Debuginfo.repo、Rocky-Sources.repo
[root@localhost ~]# ls /etc/yum.repos.d/
rocky-addons.repo  rocky-devel.repo  rocky-extras.repo  rocky.repo  rocky-security.repo
[root@localhost ~]# yum repolist
仓库 id                                      仓库名称
appstream                                    Rocky Linux 10 - AppStream
baseos                                       Rocky Linux 10 - BaseOS
extras                                       Rocky Linux 10 - Extras
1. 关闭防火墙和 SELinux
[root@localhost ~]# systemctl disable --now firewalld
Removed '/etc/systemd/system/multi-user.target.wants/firewalld.service'.
Removed '/etc/systemd/system/dbus-org.fedoraproject.FirewallD1.service'.
[root@localhost ~]# sed -i 's/^SELINUX=enforcing$/SELINUX=permissive/' /etc/selinux/config
[root@localhost ~]# setenforce 0
2. 关闭交换分区
[root@localhost ~]# swapoff -a
[root@localhost ~]# sed -i 's/.*swap.*/#&/' /etc/fstab
[root@localhost ~]# free -m
               total        used        free      shared  buff/cache   available
Mem:            3621         496        3058           9         288        3124
Swap:              0           0           0
[root@localhost ~]#
3. 安装基本软件
dnf install net-tools nfs-utils vim wget curl bash-completion device-mapper-persistent-data psmisc tree openssh openssh-server -y
4. 修改 Linux 最大连接数
[root@localhost ~]# tail -7 /etc/security/limits.conf
# 在文件末尾加上:
# End of file
* soft nofile 655350
* hard nofile 655350
* soft nproc 655350
* hard nproc 655350
* soft memlock unlimited
* hard memlock unlimited
5. 安装 IPVS
dnf install ipvsadm -y
6. 开启路由转发
[root@localhost ~]# echo 'net.ipv4.ip_forward=1' >> /etc/sysctl.conf
[root@localhost ~]# sysctl -p
net.ipv4.ip_forward = 1
三、节点基础配置
Rocky-master
[root@localhost ~]# hostnamectl hostname k8s-master01
[root@localhost ~]# bash
[root@k8s-master01 ~]# ip a
	……
2: ens160: <BROADCAST,MULTICAST,UP,LOWER_UP> mtu 1500 qdisc mq state UP group default qlen 1000
    ……
    inet 192.168.142.150/24 brd 192.168.142.255 scope global noprefixroute
#查看网卡类型:
[root@k8s-master01 ~]# ls /etc/NetworkManager/system-connections/
ens160.nmconnection
#修改为静态IP地址
[root@k8s-master01 ~]# nmcli connection modify ens160 ipv4.method manual ipv4.addresses 192.168.142.150/24 ipv4.dns "223.5.5.5 8.8.8.8" ipv4.gateway 192.168.142.2 connection.autoconnect yes
[root@k8s-master01 ~]# nmcli connection up ens160
连接已成功激活(D-Bus 活动路径:/org/freedesktop/NetworkManager/ActiveConnection/3)
[root@k8s-master01 ~]#
[root@k8s-master01 ~]#
#配置主机映射
cat > /etc/hosts <<EOF
192.168.142.150 k8s-master01 m1
192.168.142.151 k8s-node01 n1
192.168.142.152 k8s-node02 n2
192.168.142.129 hb.reg.com harbor
EOF
Rocky-node1
[root@localhost ~]# hostnamectl hostname k8s-node01 && bash

[root@k8s-node01 ~]# nmcli connection modify ens160 ipv4.method manual ipv4.addresses 192.168.142.151/24 ipv4.dns "223.5.5.5 8.8.8.8" ipv4.gateway 192.168.142.2 connection.autoconnect yes
[root@k8s-node01 ~]# nmcli connection up ens160
连接已成功激活(D-Bus 活动路径:/org/freedesktop/NetworkManager/ActiveConnection/3)
[root@k8s-node01 ~]#
Rocky-node2
[root@localhost ~]# hostnamectl hostname k8s-node02 && bash

[root@k8s-node02 ~]# nmcli connection modify ens160 ipv4.method manual ipv4.addresses 192.168.142.152/24 ipv4.dns "223.5.5.5 8.8.8.8" ipv4.gateway 192.168.142.2 connection.autoconnect yes
[root@k8s-node02 ~]# nmcli connection up ens160
连接已成功激活(D-Bus 活动路径:/org/freedesktop/NetworkManager/ActiveConnection/3)
[root@k8s-node02 ~]#
四、搭建集群
1. 安装 Docker(三台虚拟机)
#安装基础工具
dnf install -y vim wget curl net-tools bash-completion yum-utils
# 添加阿里云 Docker 仓库
yum-config-manager --add-repo \
  https://mirrors.aliyun.com/docker-ce/linux/rhel/docker-ce.repo

# 安装 Docker 及相关组件
dnf install -y docker-ce docker-ce-cli containerd.io \
  docker-buildx-plugin docker-compose-plugin


# 配置Docker
cat > /etc/docker/daemon.json <<'EOF'
{
  "data-root": "/data/docker",
  "exec-opts": ["native.cgroupdriver=systemd"],
  "log-driver": "json-file",
  "log-opts": {
    "max-size": "100m",
    "max-file": "50"
  },
  "insecure-registries": ["hb.reg.com"],
  "registry-mirrors": [
    "https://docker.m.daocloud.io",
    "https://docker.1ms.run",
    "https://dockerproxy.net",
    "https://proxy.vvvv.ee",
    "https://dockerproxy.link",
    "https://7kjolzcz.mirror.aliyuncs.com"
  ]
}
EOF

systemctl daemon-reload
systemctl enable --now docker
systemctl status docker
2. 选择 CRI 方案
K8s 靠 CRI 和运行时通信,1.24 移除内置 dockershim 后出现两种替代方案:
| 方案 | 架构 | 适用场景 |
|---|---|---|
| Docker + cri-dockerd | 加一层垫片,保留 Docker 体验 | 习惯 Docker 命令的团队 |
| Docker + containerd 直连 | Docker 仅作镜像工具,绕过 dockerd | 新项目、追求性能 |
新项目建议选 containerd,如果团队强依赖 Docker 操作习惯就选 cri-dockerd。本文使用方案一。
3. 安装 CRI(三台主机执行)
Step 1 — 下载 cri-docker
wget https://github.com/Mirantis/cri-dockerd/releases/download/v0.3.17/cri-dockerd-0.3.17.amd64.tgz

[root@k8s-node02 ~]# ls
cri-dockerd-0.3.17.amd64.tgz
[root@k8s-node02 ~]# tar -xf cri-dockerd-0.3.17.amd64.tgz
[root@k8s-node02 ~]# cp cri-dockerd/cri-dockerd /usr/bin/
[root@k8s-node02 ~]# ls /usr/bin/ | grep cri-dockerd
cri-dockerd
[root@k8s-node02 ~]# chmod +x /usr/bin/cri-dockerd
4. 配置 cri-docker 服务
cat > /usr/lib/systemd/system/cri-docker.service <<EOF
[Unit]
Description=CRI Interface for Docker Application Container Engine
Documentation=https://docs.mirantis.com
After=network-online.target firewalld.service docker.service
Wants=network-online.target
Requires=cri-docker.socket

#--pod-infra-container-image=hb.reg.com/library/pause:3.10.2 指定Harbor镜像服务器pause镜像
[Service]
Type=notify
ExecStart=/usr/bin/cri-dockerd \
  --container-runtime-endpoint fd:// \
  --network-plugin=cni \
  --pod-infra-container-image=hb.reg.com/library/pause:3.10.2
ExecReload=/bin/kill -s HUP $MAINPID
TimeoutSec=0
RestartSec=2
Restart=always
StartLimitBurst=3
StartLimitInterval=60s
LimitNOFILE=infinity
LimitNPROC=infinity
LimitCORE=infinity
TasksMax=infinity
Delegate=yes
KillMode=process

[Install]
WantedBy=multi-user.target
EOF
cat > /usr/lib/systemd/system/cri-docker.socket <<EOF
[Unit]
Description=CRI Docker socket for the API
PartOf=cri-docker.service
[Socket]
ListenStream=%t/cri-dockerd.sock
SocketMode=0660
SocketUser=root
SocketGroup=docker
[Install]
WantedBy=sockets.target
EOF
注意:此文件也可以从
wget https://github.com/Mirantis/cri-dockerd/archive/refs/tags/v0.3.17.tar.gz包中packaging/systemd/目录下获取。然后修改/etc/systemd/system/cri-docker.service文件,为Service.ExecStart字段增加--network-plugin与--pod-infra-container-image选项。--pod-infra-container-image镜像 tag 需要根据具体 k8s 安装版本指定。也就是要修改网络和根容器镜像。
5. 启动服务
systemctl daemon-reload
systemctl enable --now cri-docker
systemctl is-active cri-docker
6. 安装 Kubernetes
Step 1 — 添加 Kubernetes 源

cat <<EOF | tee /etc/yum.repos.d/kubernetes.repo
[kubernetes]
name=Kubernetes
baseurl=https://mirrors.aliyun.com/kubernetes-new/core/stable/v1.36/rpm/
enabled=1
gpgcheck=1
gpgkey=https://mirrors.aliyun.com/kubernetes-new/core/stable/v1.36/rpm/repodata/repomd.xml.key
EOF

Step 2 — 安装 K8s
dnf install -y kubelet kubeadm kubectl
#已安装软件包清单:
[root@k8s-node01 ~]# rpm -qa | grep kube
#CNI二进制插件集合:提供bridge、loopback等基础网络二进制文件,配合cri-dockerd的--network-plugin=cni参数使用
kubernetes-cni-1.9.1-150500.1.1.x86_64
#节点代理核心进程:与CRI(cri-dockerd)交互,负责创建、管理Pod;集群所有节点必须部署
kubelet-1.36.3-150500.1.1.x86_64
#客户端命令行工具:集群管理入口,执行kubectl get pod、kubectl apply等各类集群操作
kubectl-1.36.3-150500.1.1.x86_64
#集群部署工具:通过kubeadm init初始化控制平面、kubeadm join将工作节点接入集群
kubeadm-1.36.3-150500.1.1.x86_64

[root@k8s-master01 ~]# which kubelet kubeadm kubectl
/usr/bin/kubelet
/usr/bin/kubeadm
/usr/bin/kubectl

[root@k8s-master01 ~]# kubeadm version
kubeadm version: &version.Info{Major:"1", Minor:"36", EmulationMajor:"", EmulationMinor:"", MinCompatibilityMajor:"", MinCompatibilityMinor:"", GitVersion:"v1.36.3", GitCommit:"0f29094e5b73085e3802ecc1298ecae13866bfe6", GitTreeState:"clean", BuildDate:"2026-07-22T18:09:52Z", GoVersion:"go1.26.5", Compiler:"gc", Platform:"linux/amd64"}
注意:现在不要尝试启动 kube,通过上述命令检验安装成功即可。
7. 拉取所需镜像
[root@k8s-master01 ~]# kubeadm config images list
registry.k8s.io/kube-apiserver:v1.36.3
registry.k8s.io/kube-controller-manager:v1.36.3
registry.k8s.io/kube-scheduler:v1.36.3
registry.k8s.io/kube-proxy:v1.36.3
registry.k8s.io/coredns/coredns:v1.14.2
registry.k8s.io/pause:3.10.2
registry.k8s.io/etcd:3.6.8-0
注意:主节点需要导入全部镜像,从节点只需导入
kube-proxy、coredns、pause这三个镜像。
#我把所有镜像拉取到Harbor镜像服务器上,然后三个节点自动在Harbor上拉取

[root@harbor ~]# cat all-images.txt
registry.k8s.io/kube-apiserver:v1.36.3
registry.k8s.io/kube-controller-manager:v1.36.3
registry.k8s.io/kube-scheduler:v1.36.3
registry.k8s.io/kube-proxy:v1.36.3
registry.k8s.io/coredns/coredns:v1.14.2
registry.k8s.io/pause:3.10.2
registry.k8s.io/etcd:3.6.8-0

[root@harbor ~]# while read img; do docker pull $img; done < all-images.txt
[root@harbor ~]# while read img; do
  docker tag "${img}" hb.reg.com/library/"${img#registry.k8s.io/}"
  docker push hb.reg.com/library/"${img#registry.k8s.io/}"
done < all-images.txt


[root@harbor ~]# docker images
	……
hb.reg.com/library/coredns/coredns:v1.14.2           e7e6440cfd1e        102MB         23.3MB
hb.reg.com/library/etcd:3.6.8-0                      397189418d1a       88.2MB         22.9MB
hb.reg.com/library/kube-apiserver:v1.36.3            b4bc06c81fd7        128MB         29.8MB
hb.reg.com/library/kube-controller-manager:v1.36.3   ed56454bf514        114MB         26.4MB
hb.reg.com/library/kube-proxy:v1.36.3                919d710a0e8b        114MB           30MB
hb.reg.com/library/kube-scheduler:v1.36.3            128fc07d278d         83MB         20.5MB
hb.reg.com/library/pause:3.10.2                      f548e0e8e3dc       1.06MB          318kB

#注意:coredns特殊格式:registry.k8s.io/coredns/coredns:v1.14.2(两层路径)kubeadm 的--image-repository参数设计上不支持二级镜像仓库路径,需要执行下面的命令

[root@harbor ~]# docker tag hb.reg.com/library/coredns/coredns:v1.14.2 hb.reg.com/library/coredns:v1.14.2
[root@harbor ~]# docker push hb.reg.com/library/coredns:v1.14.2
kubeadm 根据规则拼接镜像地址,通过 CRI 接口请求 cri-dockerd,最终由 Docker 向 Harbor 发起镜像拉取;控制平面镜像地址由 kubeadm 管控,pause 沙箱镜像由 cri-dockerd 独立配置决定。
8. 初始化主节点
镜像拉取过程:kubeadm → 通过CRI gRPC协议 → cri-dockerd → 调用docker接口 → docker pull镜像
[root@k8s-master01 ~]# kubeadm init --apiserver-advertise-address=192.168.142.150 \
--kubernetes-version=v1.36.3 \
--service-cidr=10.10.0.0/12 \
--pod-network-cidr=10.244.0.0/16 \
--image-repository=hb.reg.com/library \
--cri-socket unix:///var/run/cri-dockerd.sock \
--ignore-preflight-errors=all

……
# 需要注意下面的输出,后面要用
Your Kubernetes control-plane has initialized successfully!

To start using your cluster, you need to run the following as a regular user:

  mkdir -p $HOME/.kube
  sudo cp -i /etc/kubernetes/admin.conf $HOME/.kube/config
  sudo chown $(id -u):$(id -g) $HOME/.kube/config

Alternatively, if you are the root user, you can run:

  export KUBECONFIG=/etc/kubernetes/admin.conf

You should now deploy a pod network to the cluster.
Run "kubectl apply -f [podnetwork].yaml" with one of the options listed at:
  https://kubernetes.io/docs/concepts/cluster-administration/addons/

Then you can join any number of worker nodes by running the following on each as root:

kubeadm join 192.168.142.150:6443 --token aqizik.2rg53a6j0gvqpm2m \
	--discovery-token-ca-cert-hash sha256:13ceb37049affce20b87038a16a09af73e07e2ad3d572644350ff3ab67612203
9. 创建 .kube 目录
[root@k8s-master01 ~]# mkdir -p $HOME/.kube
[root@k8s-master01 ~]# sudo cp -i /etc/kubernetes/admin.conf $HOME/.kube/config
[root@k8s-master01 ~]# sudo chown $(id -u):$(id -g) $HOME/.kube/config
[root@k8s-master01 ~]# export KUBECONFIG=/etc/kubernetes/admin.conf
[root@k8s-master01 ~]# kubectl get node
NAME           STATUS     ROLES           AGE   VERSION
k8s-master01   NotReady   control-plane   29m   v1.36.3
10. 增加工作节点
[root@k8s-node01 ~]# kubeadm join 192.168.142.150:6443 --token aqizik.2rg53a6j0gvqpm2m \
        --discovery-token-ca-cert-hash sha256:13ceb37049affce20b87038a16a09af73e07e2ad3d572644350ff3ab67612203 \
    --cri-socket unix:///var/run/cri-dockerd.sock
	……

[root@k8s-node02 ~]# kubeadm join 192.168.142.150:6443 --token aqizik.2rg53a6j0gvqpm2m \
        --discovery-token-ca-cert-hash sha256:13ceb37049affce20b87038a16a09af73e07e2ad3d572644350ff3ab67612203 \
    --cri-socket unix:///var/run/cri-dockerd.sock
	……

[root@k8s-master01 ~]# kubectl get node
NAME           STATUS     ROLES           AGE   VERSION
k8s-master01   NotReady   control-plane   34m   v1.36.3
k8s-node01     NotReady   <none>          67s   v1.36.3
k8s-node02     NotReady   <none>          60s   v1.36.3
五、部署网络插件 Calico
1. 下载 Calico 部署文件
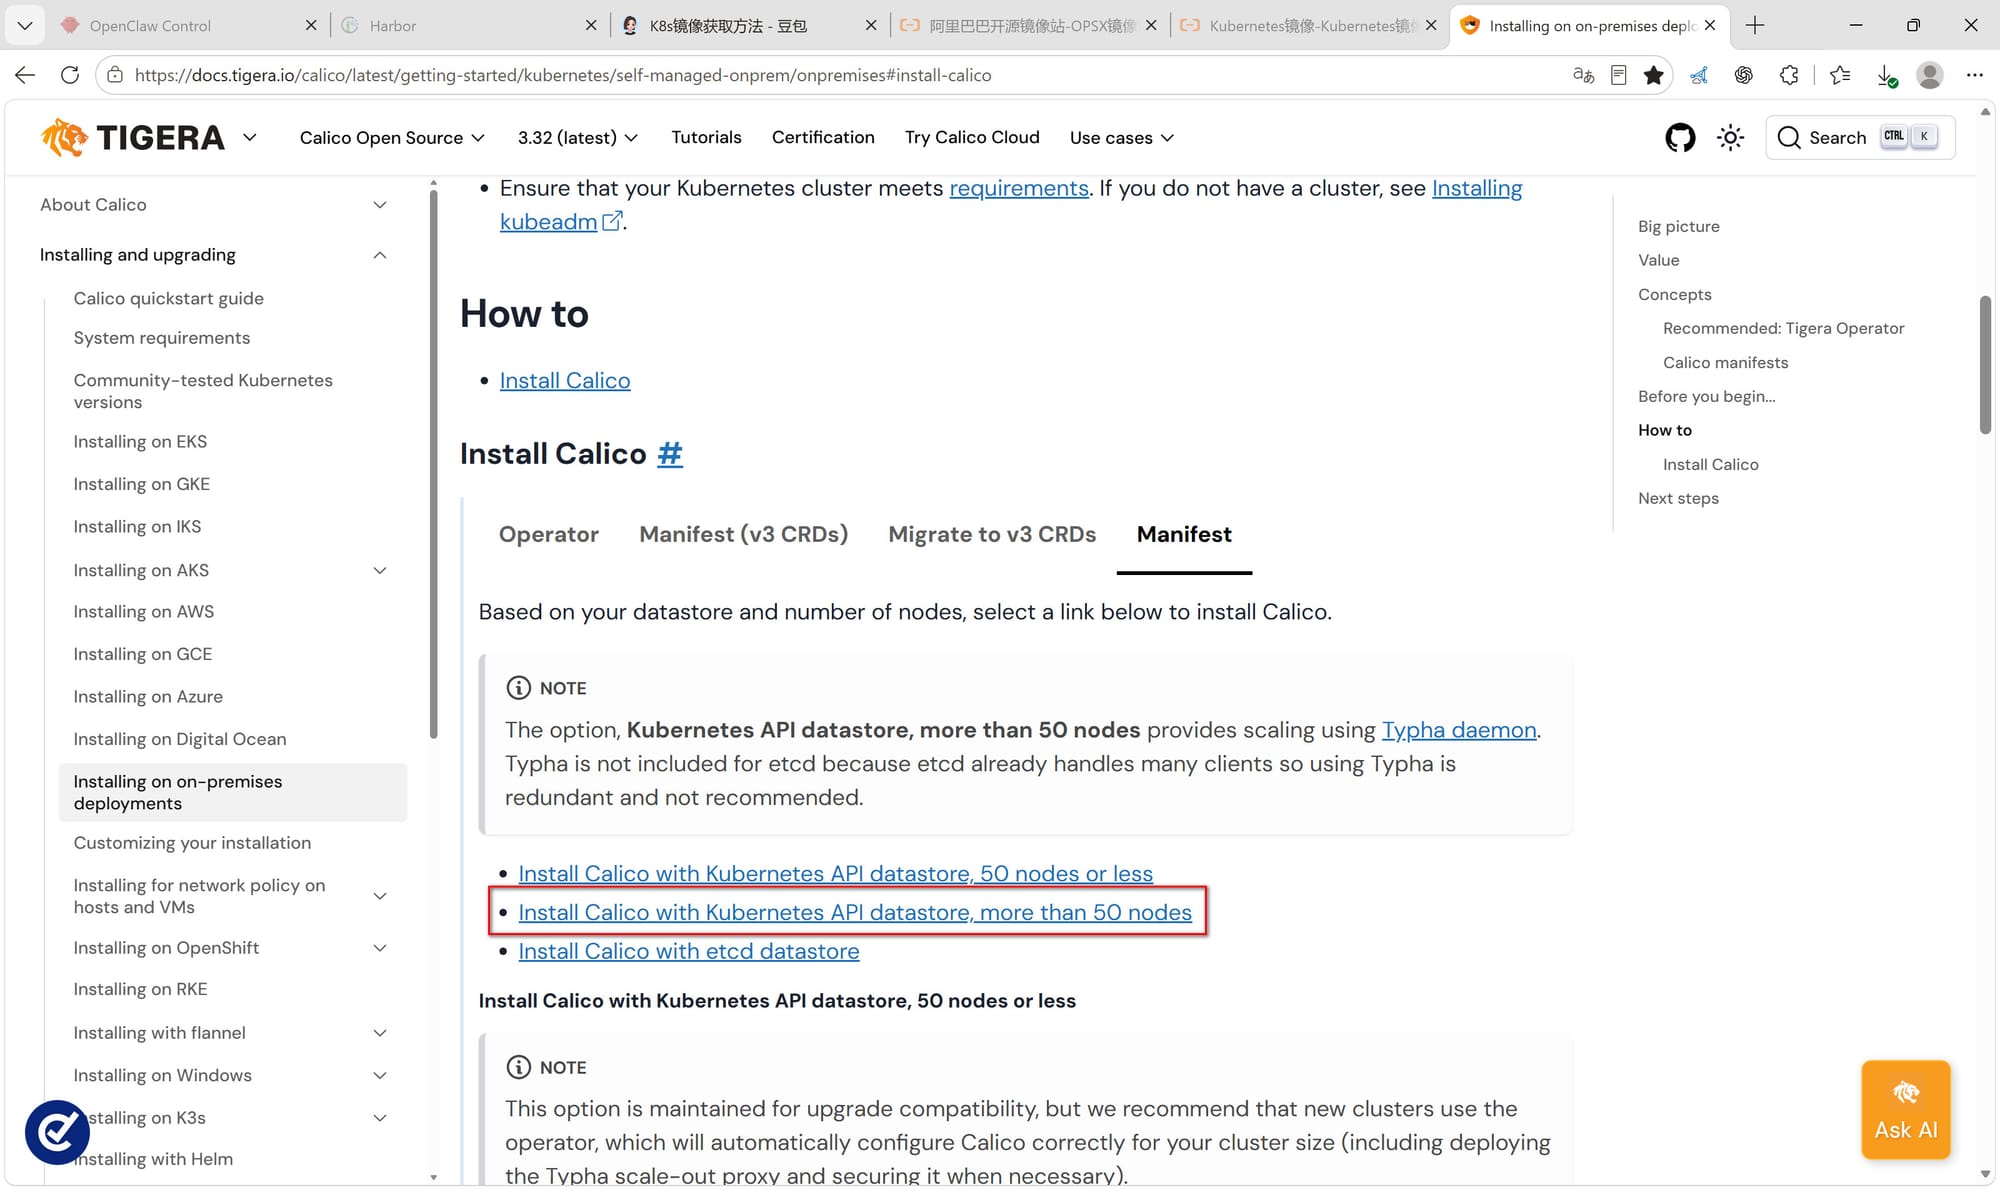
[root@k8s-master01 ~]# curl https://raw.githubusercontent.com/projectcalico/calico/v3.32.1/manifests/calico.yaml -o calico.yaml
  % Total    % Received % Xferd  Average Speed   Time    Time     Time  Current
                                 Dload  Upload   Total   Spent    Left  Speed
100  341k  100  341k    0     0   155k      0  0:00:02  0:00:02 --:--:--  155k
[root@k8s-master01 ~]# ll
总计 15748
-rw-------. 1 root root        719  8月 2日 18:31 anaconda-ks.cfg
-rw-r--r--. 1 root root     349572  8月 3日 17:52 calico.yaml
drwxr-xr-x. 2 1001 docker       25 2025年 4月 1日 cri-dockerd
-rw-r--r--. 1 root root   15767044 2025年 4月 1日 cri-dockerd-0.3.17.amd64.tgz
[root@k8s-master01 ~]# grep image* calico.yaml
          image: quay.io/calico/cni:v3.32.1
          imagePullPolicy: IfNotPresent
          image: quay.io/calico/cni:v3.32.1
          imagePullPolicy: IfNotPresent
          image: quay.io/calico/node:v3.32.1
          imagePullPolicy: IfNotPresent
          image: quay.io/calico/node:v3.32.1
          imagePullPolicy: IfNotPresent
          image: quay.io/calico/kube-controllers:v3.32.1
          imagePullPolicy: IfNotPresent
[root@k8s-master01 ~]#
2. 拉取镜像并推送到 Harbor
#这里我也把需要的镜像拉取到Harbor上,在Harbor上操作:
docker pull quay.io/calico/cni:v3.32.1
docker pull quay.io/calico/node:v3.32.1
docker pull quay.io/calico/kube-controllers:v3.32.1

docker login hb.reg.com

docker tag quay.io/calico/cni:v3.32.1 hb.reg.com/library/calico/cni:v3.32.1
docker tag quay.io/calico/node:v3.32.1 hb.reg.com/library/calico/node:v3.32.1
docker tag quay.io/calico/kube-controllers:v3.32.1 hb.reg.com/library/calico/kube-controllers:v3.32.1

docker push hb.reg.com/library/calico/cni:v3.32.1
docker push hb.reg.com/library/calico/node:v3.32.1
docker push hb.reg.com/library/calico/kube-controllers:v3.32.1
3. 修改并部署 Calico
#修改calico.yaml文件内的镜像地址
[root@k8s-master01 ~]# sed -i 's#quay.io/calico/#hb.reg.com/library/calico/#g' calico.yaml
[root@k8s-master01 ~]# grep 'image:' calico.yaml
          image: hb.reg.com/library/calico/cni:v3.32.1
          image: hb.reg.com/library/calico/cni:v3.32.1
          image: hb.reg.com/library/calico/node:v3.32.1
          image: hb.reg.com/library/calico/node:v3.32.1
          image: hb.reg.com/library/calico/kube-controllers:v3.32.1

[root@k8s-master01 ~]# vim calico.yaml
……
7603             # Enable IPIP
7604             - name: CALICO_IPV4POOL_IPIP
7605               value: "off"
7606             # Enable or Disable VXLAN on the default IP pool.
7607             - name: CALICO_IPV4POOL_VXLAN
7608               value: "Never"
7609             # Enable or Disable VXLAN on the default IPv6 IP pool.
7610             - name: CALICO_IPV6POOL_VXLAN
7611               value: "Never"
……
7633             - name: CALICO_IPV4POOL_CIDR
7634               value: "10.244.0.0/16"


# 部署 calico
[root@k8s-master01 ~]# kubectl apply -f calico.yaml
poddisruptionbudget.policy/calico-kube-controllers created
serviceaccount/calico-kube-controllers created
serviceaccount/calico-node created
serviceaccount/calico-cni-plugin created
configmap/calico-config created
……
4. 验证部署结果
[root@k8s-master01 ~]# kubectl get pods -n kube-system -w
NAME                                       READY   STATUS    RESTARTS   AGE
calico-kube-controllers-5b95cfb5d8-fh9xb   1/1     Running   0          64s
calico-node-8g9fj                          1/1     Running   0          64s
calico-node-fr5b9                          1/1     Running   0          64s
calico-node-k8sd9                          1/1     Running   0          64s
coredns-8494d4c5fc-dh2n8                   1/1     Running   0          66m
coredns-8494d4c5fc-mblkx                   1/1     Running   0          66m
etcd-k8s-master01                          1/1     Running   0          66m
kube-apiserver-k8s-master01                1/1     Running   0          66m
kube-controller-manager-k8s-master01       1/1     Running   0          66m
kube-proxy-bpkm2                           1/1     Running   0          66m
kube-proxy-tkdlx                           1/1     Running   0          33m
kube-proxy-ww5rj                           1/1     Running   0          33m
kube-scheduler-k8s-master01                1/1     Running   0          66m
coredns-8494d4c5fc-mblkx                   1/1     Running   0          67m


[root@k8s-master01 ~]# kubectl get node
NAME           STATUS   ROLES           AGE   VERSION
k8s-master01   Ready    control-plane   67m   v1.36.3
k8s-node01     Ready    <none>          34m   v1.36.3
k8s-node02     Ready    <none>          34m   v1.36.3
[root@k8s-master01 ~]# kubectl get node -o wide
NAME           STATUS   ROLES           AGE   VERSION   INTERNAL-IP       EXTERNAL-IP   OS-IMAGE                        KERNEL-VERSION                              CONTAINER-RUNTIME
k8s-master01   Ready    control-plane   68m   v1.36.3   192.168.142.150   <none>        Rocky Linux 10.2 (Red Quartz)   6.12.0-211.16.1.el10_2.0.1.x86_64 (amd64)   docker://29.7.1
k8s-node01     Ready    <none>          34m   v1.36.3   192.168.142.151   <none>        Rocky Linux 10.2 (Red Quartz)   6.12.0-211.16.1.el10_2.0.1.x86_64 (amd64)   docker://29.7.1
k8s-node02     Ready    <none>          34m   v1.36.3   192.168.142.152   <none>        Rocky Linux 10.2 (Red Quartz)   6.12.0-211.16.1.el10_2.0.1.x86_64 (amd64)   docker://29.7.1
[root@k8s-master01 ~]# kubectl get pod -A
NAMESPACE     NAME                                       READY   STATUS    RESTARTS   AGE
kube-system   calico-kube-controllers-5b95cfb5d8-fh9xb   1/1     Running   0          4m2s
kube-system   calico-node-8g9fj                          1/1     Running   0          4m2s
kube-system   calico-node-fr5b9                          1/1     Running   0          4m2s
kube-system   calico-node-k8sd9                          1/1     Running   0          4m2s
kube-system   coredns-8494d4c5fc-dh2n8                   1/1     Running   0          69m
kube-system   coredns-8494d4c5fc-mblkx                   1/1     Running   0          69m
kube-system   etcd-k8s-master01                          1/1     Running   0          69m
kube-system   kube-apiserver-k8s-master01                1/1     Running   0          69m
kube-system   kube-controller-manager-k8s-master01       1/1     Running   0          69m
kube-system   kube-proxy-bpkm2                           1/1     Running   0          69m
kube-system   kube-proxy-tkdlx                           1/1     Running   0          36m
kube-system   kube-proxy-ww5rj                           1/1     Running   0          36m
kube-system   kube-scheduler-k8s-master01                1/1     Running   0          69m
至此,基于 cri-dockerd 搭建的三节点 K8s 集群部署完成,Calico 网络插件正常运行,三台节点全部进入 Ready 状态,集群具备 Pod 调度与网络通信能力。
六、功能测试
部署一个测试 Pod 验证集群可用性:
# 创建测试 Pod
[root@k8s-master01 ~]# kubectl run nginx-test --image=hb.reg.com/library/nginx:latest --port=80
pod/nginx-test created

# 暴露为 NodePort
[root@k8s-master01 ~]# kubectl expose pod nginx-test --port=80 --type=NodePort
service/nginx-test exposed

# 查看 Pod 和服务状态
[root@k8s-master01 ~]# kubectl get pod,svc
NAME             READY   STATUS    RESTARTS   AGE
pod/nginx-test   1/1     Running   0          30s

NAME                 TYPE        CLUSTER-IP      EXTERNAL-IP   PORT(S)        AGE
service/kubernetes   ClusterIP   10.10.0.1       <none>        443/TCP        78m
service/nginx-test   NodePort    10.10.117.216   <none>        80:31245/TCP   10s

# 测试访问(在任意节点执行)
[root@k8s-node01 ~]# curl http://192.168.142.151:31245
<!DOCTYPE html>……  # 返回 Nginx 欢迎页即表示集群正常

# 清理测试资源
[root@k8s-master01 ~]# kubectl delete pod nginx-test
[root@k8s-master01 ~]# kubectl delete svc nginx-test
集群常用命令
# 查看集群节点
kubectl get nodes -o wide
# 查看系统组件pod
kubectl get pods -n kube-system
# 查看集群健康状态
kubectl get cs
# calico查看IP池
kubectl get ippools -o yaml
# 查看集群所有资源简要信息
kubectl api-resources
强列建议:最后,强烈建议给四台虚拟机都拍个快照。
踩坑汇总
| 序号 | 问题 | 现象 | 解决方案 |
|---|---|---|---|
| 1 | mount /dev/sr0 失败 | Can't open blockdev |
虚拟机设置中勾选"已连接" |
| 2 | 跳过 ./prepare 导致启动异常 |
Harbor 启动后组件状态异常 | 必须先执行 ./prepare --with-trivy 再 ./install.sh |
| 3 | CoreDNS 镜像二级路径不兼容 | kubeadm 无法拉取 coredns/coredns |
额外打平标签:docker tag .../coredns/coredns:v1.14.2 .../coredns:v1.14.2 |
| 4 | join 命令 token 过期 | kubeadm join 报 token 无效 |
kubeadm token create --print-join-command 重新生成 |
| 5 | 网卡名称不一致 | nmcli 配置后网络不生效 | 先 ls /etc/NetworkManager/system-connections/ 确认实际网卡名 |
| 6 | Node 状态长期 NotReady | CNI 网络插件未部署 | 部署 Calico 或 Flannel 等网络插件即可 |